Gear:
The auto showcasing industry is an enormous business. With a large number of vehicle deals in question, it’s not difficult to perceive why producers are eager to pay abundantly to have staggering pictures of their most recent models made. If you’ve ever seen an expert auto photography shoot, at that point, you’ll realize that a great deal of costly stuff and areas go into flaunting each exquisite bend and projection of these superb metallic boxes.
However, imagine a scenario in which you don’t have a gigantic cluster of lighting, the distribution center measured studio or the enormous spending camera and focal points utilized in those shoots. Indeed, like most things in the realm of photography, in case you’re willing to get somewhat car transparent background imaginative and invest a little energy in Photoshop, you can wind up for sure exceptionally cool, calm pictures that are similarly as significant as those as much as possible creations, however at a small amount of the expense.
Car photography tips 01 & 02:
GearIndeed, the more significant part of the stuff you need for these shots, you’ll probably effectively own. With merely a moderately little cost for two or three pieces of spending gear (which will undoubtedly see parcels more use later on), you’ll be set to go.
So all you’ll require to get a comparative look at this is any passage level DSLR (mirrorless will work fine as well) and unit focal point, a whole mount (or anything sufficiently solid to hold the camera level), and a good blaze/trigger combo and a softbox.
Presently, as I referenced above, you probably as of now have the DSLR and stand, so what amount will an off-camera streak and softbox cost? Not as much as you may suspect. The arrangement I utilize cost under £80 (USD 110) complete for a Yonne YN560iii streak/trigger and a Newer 24inch softbox, the two of which are accessible on Amazon.
Car photography tips 03 & Auto photography tips 04
Programming and studio
Concerning the altering side of things, the approach of Photoshop (and Lightroom) Creative Cloud (CC), and the chance to pay month to month for a membership, these two amazingly incredible photograph altering programs have become a ton simpler to legitimize financially. For around $9.99 every month (at the hour of this composition), you can get full access and regular updates to BOTH projects, which, contrasted with the expense for Photoshop CS6 (the last independent version before CC was delivered), is an incredibly extraordinary arrangement.
At last, what might be said about the shooting area, I hear you inquire. Indeed, this is the “studio” I utilized.
Car photography tips 05 & Auto photography tips 06
The Invisible Black Background
As should be obvious, these shots can even be taken without trying to hide, inside a little open air space. The way to accomplish this look is to utilize a strategy called the Invisible Black Background and an expression begat by my old buddy Glyn Dewis. This strategy could fill a whole devoted instructional exercise all alone. DPS has recently been seen as a video direct from Glyn himself (which I ask you to watch, as it has countless various applications).
Fundamentally the thing you are doing is utilizing your ISO, shade speed, and opening together to remove all-encompassing light from your shot, to record a dark picture. Consider it enormously underexposing your image. This is so when you fire the glimmer to catch your working picture, and all the camera sees there is the light ousted by the blaze and none of the encompassing light. Subsequently, the term, undetectable dark foundation.
So, it is difficult to mention what settings you should use to accomplish this, as it is altogether directed by the encompassing light degrees of your scene. However, as a gauge set, start at around ISO 100, f/11, and a shade speed of 1/125th of a second. If you find that you can, in any case, see detail or surrounding light in the shot from that point onward, at that point either utilize a higher f/number (like f/16) or a somewhat quicker shade speed (making a point not to go over your camera’s maximum blaze sync speed, for the most part around 1/160th – 1/320th relying upon the camera).
Whenever you’ve messed with those settings and have a dark picture on your screen, have a good time stepping through a couple of exam shots with the glimmer and softbox, raising and bringing down the force of your blaze in like manner for the openness you need. Presently how about we get to the fabulous piece at that point – shooting!
Shooting Setup
When you have your spending pack gathered, the cycle to catch your shots is genuinely straightforward. With your glimmer trigger appended to the hot shoe of your camera and your blaze head fitted to the lightbox, set the camera on self-clock mode. Line your camera and mount in advance and focus on the vehicle. At that point, hit the screen button, hold your blaze and softbox straightforwardly over one side of the vehicle’s hood, with the light looking down toward the floor, and trust that the shot will discharge. Watch that you’re content with the light position and afterward rehash the cycle for the vehicle’s opposite side.
It would help if you wind up with several pictures that resemble this:
Auto photography tips 07 & Auto photography tips 08
This shooting procedure, and the accompanying post-preparing strategy, would then be utilized for all other angles of the vehicle you need to shoot. Yet, for this article, I’ll focus on the front profile as it were.
Altering Your Automotive Photography
Open your pictures in Photoshop. If you shoot in a simple arrangement, ensure that any worldwide changes you make to white equilibrium, openness, contrast, and so forth In Adobe Camera Raw (ACR) to one picture are made to all the others. If they are not adjusted, when the different sides of your shots are consolidated, you’ll end up with an odd-looking picture.
Consolidate your shots as layers
When your pictures are open in the entire Photoshop workspace, you should layer one image on top of the other. The least demanding approach to do this is to pull the picture tabs separated, so you have two separate workspaces (see beneath).
Auto photography tips 09
While holding the move key, intuitive the Background layer from the layers board of one picture over to the next workspace. This will naturally make another layer of your imported image, and by holding the move key, it will drop it straight to the next layer. Your layers board should now resemble this.
Auto photography tips 10
Try not to stress over which layer sits on top of the other at this stage, as the following step should be possible in any case.
Mix the layers
Then, ensure that you have the top layer chose in the layers board and afterward click the mix mode drop-down box at the highest point of the board and select “Help.”
Car photography tips 12
This advises the top layer to mix with the one beneath and uncover the layer under, BUT just where more brilliant pixels are distinguished. In that capacity, the top layer’s piece where the picture is as of now lit remaining parts unaffected, while the dim portion of the top layer is disguised, uncovering the lighter portion of the layer underneath.
Your picture should now look something like this:
Auto photography tips 13
Now, you’ll need to blend the noticeable layers, as any changes you make past this should apply to the two layers. To do this, just right-click on both of the layers and select Merge Visible.
Car photography tips 14
Refining
On the off chance that your shot has any reflections, similar to mine has on the highest point of the hood (I didn’t adjust my settings enough toward the starting to record a dark picture. However, it’s a decent learning point!) at that point there are a couple of methods of eliminating them. Be that as it may, you may locate the best way to battle them is to utilize the recuperating brush apparatus, which is genuinely like the Proximity Match alternative of the spot mending brush yet permits you more noteworthy control by allowing you to pick your source region.
It additionally gives you a smoother change around your brushed regions, so the edges of your problematic parts become much less characterized, assisting with mixing them into the remainder of the picture. By choosing a nonaffected area near your appearance and brushing over the edges on various occasions, you’ll see it winds up looking somewhat more like this.
Car photography tips 15
Consume the edges
To polish off this region and mix in somewhat further, you can utilize the Burn device. Set it to influence just the shadows, at a haziness of around half. By making several delicate clearing brushes over the hood’s highest point, you can adequately impersonate light tumble off from the glimmer.
Car photography tips 16
Clone out undesirable pieces
Finally, contingent upon the vehicle you’re shooting, you might need to eliminate the tag, which is a straightforward undertaking for the clone stamp apparatus (S hotkey easy route). The technique for doing this generally relies upon the sort of flame broil your vehicle has yet insofar as the tag doesn’t take up the entire front finish of the car, at that point taking different examples from various spots and cloning them over the plate ought to be simple.
Auto photography tips 17
You should wind up with something like this:
Car photography tips 18
You’ll likewise have to eliminate any undesirable components duplicated during the cloning cycle, for example, the rehashed Quattro identifications here. The spot recuperating brush in substance mindful mode works best by choosing a brush size just somewhat more significant than the markers.
Car photography tips 19
Last contacts
On the off chance that there are any final details, you need to add now (like the S-Line identification I imported from the picture I took of the side wing at the highest point of the article) at that point right now is an ideal opportunity to do it.
To add additional components, open your benefactor picture in Photoshop, utilize the speedy choice instrument, and mark around the element, and hit CMD/CTRL + C.
Car photography tips 20
At that point, return to your top picture and hit CMD/CTRL+V. Contingent upon the size of the photograph you’ve duplicated from, this will probably wind up being ludicrously excessively huge. To address this, ensure the component’s layer is chosen, and go to Edit>Free Transform and resize/position it to suit.
Auto photography tips 22
If you likewise locate that the additional component is finished or underexposed, hit the openness setting in the changes board, right-click on the layer it makes, and selects Create cutting cover to guarantee that any progressions to openness apply just to the component and not the entire picture (or do this as an Adjustment Layer which is non-dangerous).
Car photography tips 23
To ensure that your vehicle gets the entirety of the consideration and nothing else around it, select the Burn device once more, actually set to influence shadows, and delicately brush out the floor around the vehicle’s front.
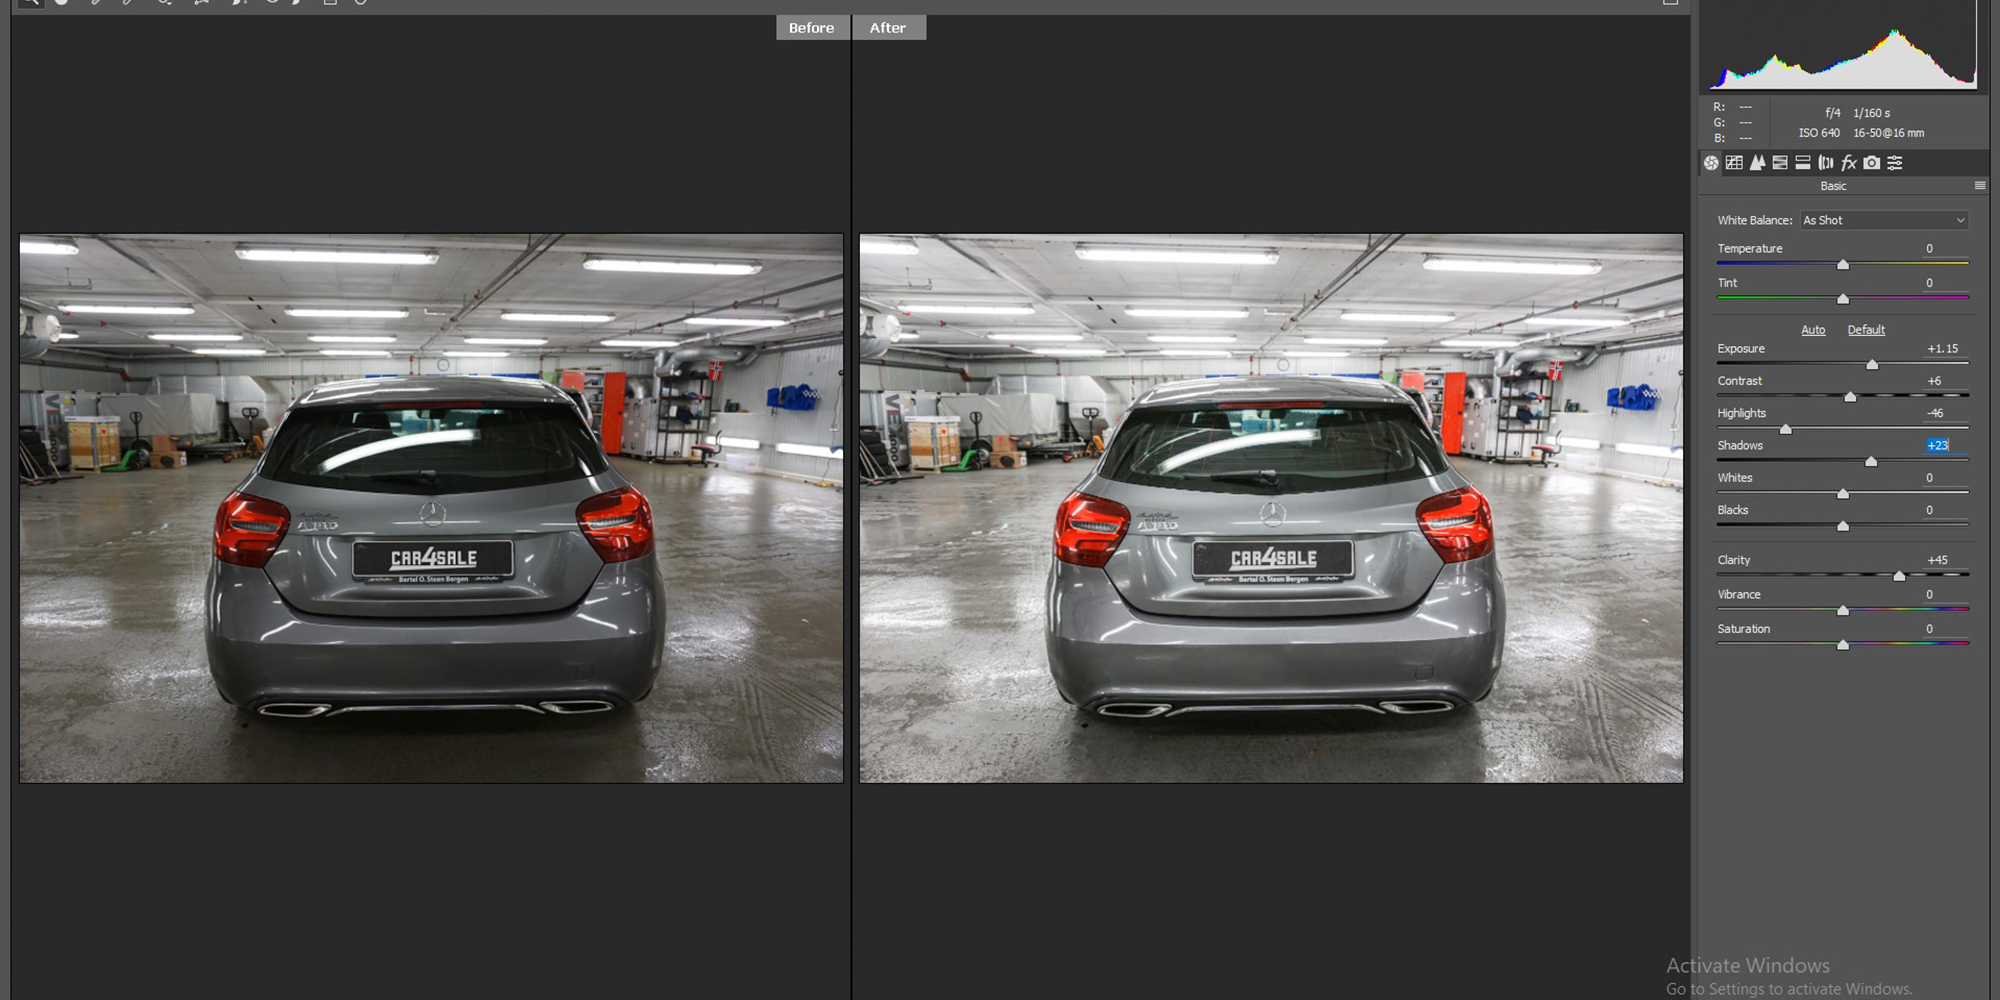
Finally, to give your picture a touch of punch, you can bring it into the Raw Camera Filter (Filter> Raw Camera Filter), which provides you with most of the alternatives accessible for a crude picture regardless of whether you’re altering a JPG record.
This part is down to taste, yet I like to add a touch of difference, lucidity, and sharpness to make the picture overly fresh and bring the shadows somewhat just as a slight harvest and fix. Have a great time with it and see what you think looks best.
At last
From that point onward, exit out of the Camera Raw channel, appreciate your artistry, and envision it gracing the pages of your vehicle magazine!