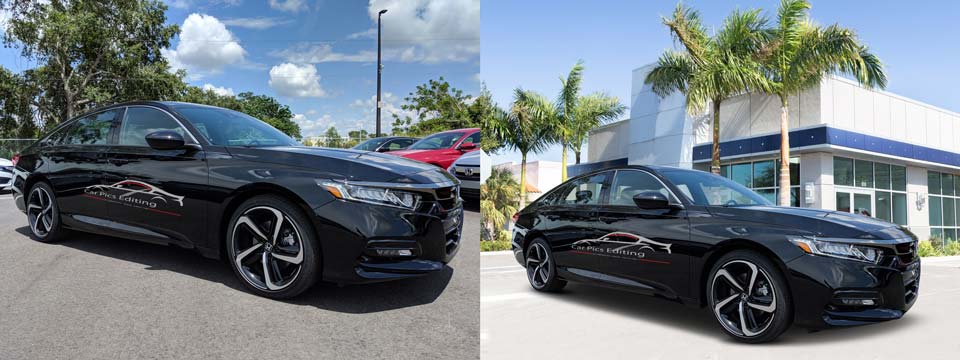
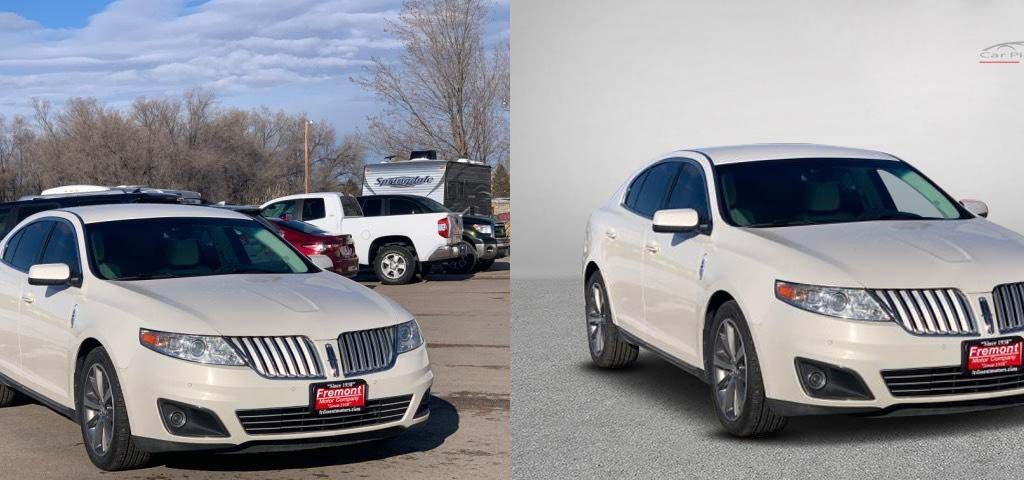
Compositing another foundation drastically changes a tasteless and drilling setting into a substantially more outwardly engaging area that can help improve the state of mind or air you need to accomplish with the photograph. These two photos were both taken on a similar void street, however with the enchantment of some Photoshop altering, one is presently set in a cool hilly district, and the other in an extraordinary city!
These Photoshop compositing strategies can be applied to a wide range of photograph subjects, yet they are especially powerful for car photography. While vehicles are a moderately simple subject to work with, reflections are the greatest factor that decides the reasonableness for a piece. Utilizing a Circular Polarizing Filter on your camera can diminish most of the appearance in the vehicle body and windows, yet any extras can either be altered out utilizing Photoshop’s stepping apparatuses or fused into the topic of the new condition. For example, this photograph has a twisted impression of a structure at the edge of the vehicle, however, it will supplement the new city area.
Download the picture from your camera and make any essential post-handling changes in accordance with right the general tone and shading balance.
So as to put the vehicle onto another foundation, it first needs cutting out. Utilize the Pen device to follow around the vehicle plot, remaining two or three pixels from the edge to abstain from catching any crawls of the setting in the determination.
Generally make the way along the base of the vehicle, at that point follow the blueprint to the beginning stage to shape a ceaseless way.
Right snap and pick Make Selection, at that point Copy and Paste the cut-out of the vehicle onto another layer.
Another foundation would now be able to be glued between the first Background layer and the new vehicle cutting. The new view photograph more likely than not been taken at a comparative point and take after the lighting of the scene. This picture of a Road in the City by Jimmy Yan on Shutterstock highlights a street subsiding into the separation a similar way as my unique photo, and the region is concealed simply like the underlying area.
To precisely coordinate the point of the scenes, lessen the darkness of the new foundation layer and move it into position so the skyline lines cover.
The compositing procedure turns out to be a lot simpler if the first street is saved in the last alter since the vehicle is now reasonably situated with the right concealing and edge. Apply a Layer Mask to the new view layer and start painting with a delicate dark brush in the veil to delete the frontal area to bring back the first street.
Krebs or walkways are helpful highlights of pretty much every street photo that can be utilized as a crease to mix the two foundations. Alter the size of the brush and utilize the X key to switch among highly contrasting to delete and re-establish the cover.
The new foundation will require a few changes in accordance with making the creation increasingly sensible. First proselyte the layer to a Smart Object so any channels are applied non-damagingly, so they can be altered if essential.
Flipping off the new foundation layer to contrast it and the first shows a distinction in the profundity of field. The components out of sight of the first picture are impressively foggy, while the stock photo was taken with a lot of littler gap.
Make a psychological depiction of the haze sum from the camera picture, at that point switch back the permeability of the layer and go to Filter > Blur Gallery > Field Blur.
Increment the Blur an incentive to mirror the profundity of field impact of the first picture. Normally this will be a moderately little estimation of under 10px.
The Blur Gallery channels have some extra devices that are valuable for coordinating the presence of the two photos. The vehicle shows some unpretentious ISO commotion, though the foundation is a lot of more clean. Increment the Grain Amount slider to recreate some clamor out of sight as well.
The vehicle was cut around its diagram, however, the territory inside the window despite everything shows the first background. Apply a layered veil and utilize the brush instrument to delete the undesirable segment to uncover the right foundation. Utilizing a moderate hardness setting for the brush tip keeps away from an unreasonable hard edge.
The territory through the glass wouldn’t be so splendid and clear, so draw a way around the window with the Pen instrument and make a choice.
Include another layer, at that point fill the determination with a shading tested from the close-by window. Change the mixing method of the layer to duplicate to permit the foundation to appear on the other side.
Diminish the obscurity of the window overlay layer until the foundation appears as though it is as a rule practically saw through glass.
Survey the picture very close shows the vehicle with a ridiculously hard edge from where it has been cut with the Pen apparatus. Select the vehicle layer, at that point actuate the Blur instrument.
Decrease the quality of the instrument to around 50-70% in the toolbar, at that point utilizing a little brush, paint around the edge of the vehicle to recreate the characteristic focal point obscure. The edges farthest away require more obscuring than the frontal area.
An extraordinary method to polish off a picture with some regular shading evaluating and lighting impacts is utilizing my free light whole overlays. Open at least one record at that point reorder them into the archive and scale them to estimate. Change the mixing mode to Screen to make the dim foundation imperceptible, permitting the bright segment to interface with the picture.
Diminish the murkiness of the layer to change the effect of the overlay. Layering up overlays can include some dynamic light throws over the image.